 Save to Pinterest
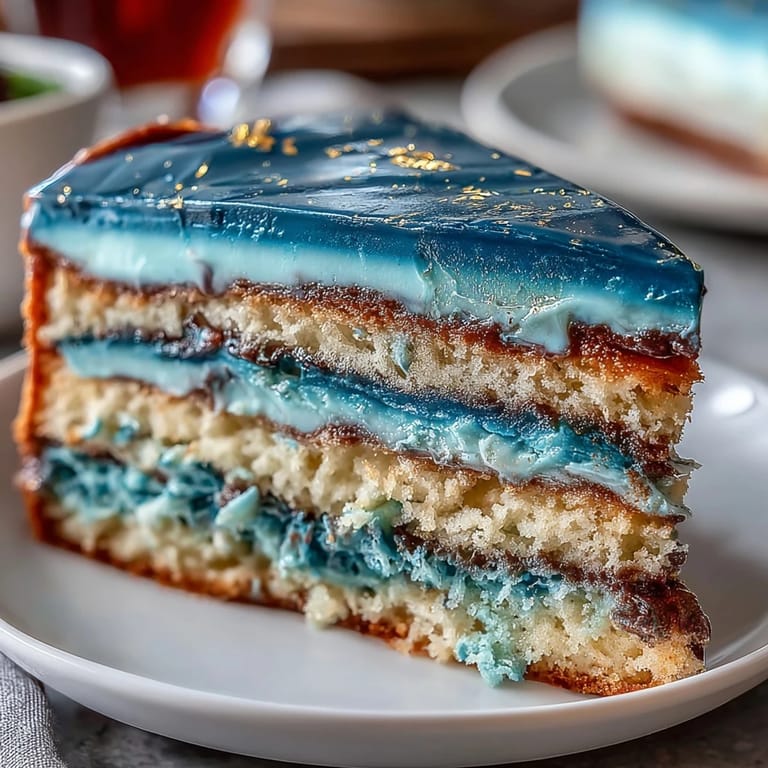
 When the scent of vanilla and the sight of shimmering gold filled my kitchen, I knew something extraordinary was about to be created. The cake batter was flecked with splashes of blue, each swirl promising a dramatic reveal after baking. It's not just the colors that excite me—the anticipation comes with imagining the moment when the layers are first sliced, unveiling that ombre. Decorating this graduation cake became a lively dance of frosting and gold leaf, my hands trembling a little with each finishing touch. I never expected how much joy and pride would come from a cake meant for a milestone, but it lingers long after the last crumb is eaten.
I remember baking this cake for my cousin's graduation party, laughing when we almost ran out of blue food coloring after misjudging how much the darkest layer needed. Everyone crowded around the kitchen island as I gently pressed gold leaf onto the frosted edges, my cousin whispering,"Make it extra sparkly". The kitchen was alive with chatter and camera flashes as the cake was sliced, revealing shades of navy and sky. The moment felt both triumphant and tender. That blue and gold cake became more than dessert; it was the centerpiece of our celebration.
Ingredients
- All-purpose flour: Gives the cake structure, but sifting first ensures softness and even texture.
- Baking powder & baking soda: These are crucial for rise—combine them fresh for a tall, fluffy crumb.
- Salt: Enhances flavor and balance—don’t skip it, even in dessert.
- Unsalted butter: Room temperature butter creams smoothly, creating tender cake and lush buttercream.
- Granulated sugar: Aerates the batter and sweetens the layers; beating it well with butter is key.
- Eggs: Room temperature eggs help the batter emulsify for an even bake.
- Vanilla extract: Pure vanilla adds depth and brings out the richness of the blue tones.
- Whole milk: Room temperature milk makes for moist, even layers without splitting the batter.
- Blue gel food coloring: Using navy, royal, and light blue shades gives that perfect graduation ombre.
- Powdered sugar: Sifted before mixing for a silky smooth buttercream.
- Edible gold leaf or gold dust: Adds drama and elegance; handle gently with clean, dry tools.
- Clear alcohol (vodka or lemon extract): For mixing gold dust to paint accents without adding flavor.
Tired of Takeout? 🥡
Get 10 meals you can make faster than delivery arrives. Seriously.
One email. No spam. Unsubscribe anytime.
Instructions
- Set Your Stage:
- Preheat the oven to 350°F and line three 8-inch pans with parchment paper; the crunch of the paper and clank of pans means cake magic is coming.
- Mix Dry Ingredients:
- Whisk flour, baking powder, baking soda, and salt in a bowl—try to catch the faint flour cloud before it settles.
- Cream Butter & Sugar:
- Beat butter and sugar until pale and fluffy, letting the mixer hum and scrape down the sides; you’ll know it’s ready when the butter lightens.
- Add Eggs & Vanilla:
- Crack eggs in one by one, mixing each until silky, then stir in the vanilla—watch for the glossy batter.
- Combine & Color:
- Add flour mix and milk in turns, finish with flour, and then divide into three bowls; time for blue gel coloring—start light, go bold, and expect stained fingertips.
- Bake the Layers:
- Smooth each batter into separate pans, then bake for 25–30 minutes until a toothpick comes out clean; the kitchen will smell sweet and warm.
- Cool Completely:
- Let cakes cool ten minutes in pans, then flip onto wire racks; patience here pays off with easier stacking later.
- Make Buttercream:
- Cream room-temperature butter, add powdered sugar, vanilla, salt, and milk until billowy; reserve some for a crumb coat, tint the rest dark blue for a dramatic finish.
- Assemble Layers:
- Level cakes if needed, stack from darkest to lightest, dotting buttercream between each and gently pressing down for stability.
- Crumb Coat & Chill:
- Sweep a thin layer of plain buttercream over the whole cake, then chill for 20 minutes to lock crumbs in place.
- Finish Frosting:
- Frost with dark blue buttercream, blending lighter shades at the top; use your spatula to sweep up the sides for an ombre look.
- Apply Gold Accents:
- With gentle hands, press edible gold leaf or brush gold dust across the surface—every streak catches light, turning the cake into sculpture.
- Chill & Celebrate:
- Refrigerate until ready to serve; anticipation builds as each layer settles and the gold shimmers in the fridge light.
 Save to Pinterest
 This cake became a showstopper the afternoon my nephew finished high school. As the congratulatory speeches ended, someone joked the cake looked too fancy to eat—but within moments, forks were sinking into blue layers and gold crumbs. It was the one dessert everyone talked about, and even the leftovers felt like a little luxury.
Getting the Ombre Just Right
Making ombre layers is not just about color—it’s about balance. Start with a tiny amount of gel coloring, then build hue slowly for each bowl. Mixing too much can make layers overly dark; spread samples on parchment to check the shade. Frosting blends are easier with a cake turntable but patience works wonders, too. Try keeping a clean spatula handy for transitions.
Gold Details That Sparkle
Gold leaf is delicate and can tear, so use tweezers or soft brushes for finesse. If you prefer gold dust, mix a tiny splash of clear alcohol and swirl with a brush for painterly streaks. Gold accents always go farther than expected—a little bit draws big compliments. Press gold gently over chilled buttercream so it sticks without wilting. Snap a picture before serving; it disappears quickly when guests arrive.
Making It Graduation-Worthy
Adding a graduation topper or chocolate star instantly personalizes the cake. Stick to edible decorations—you’d be surprised how many store-bought gold items are just for display. Pairing dessert with sparkling cider adds festive fun, even for younger guests. Graduation cake feels most special when celebrating together—slice generously and enjoy every crumb.
- Go bold with blue layers; don’t hold back, they bake lighter than they tint.
- Work slowly with gold accents, a rushed hand rips leaf.
- Chill the cake before and after decorating for sharp lines and clean slices.
 Save to Pinterest
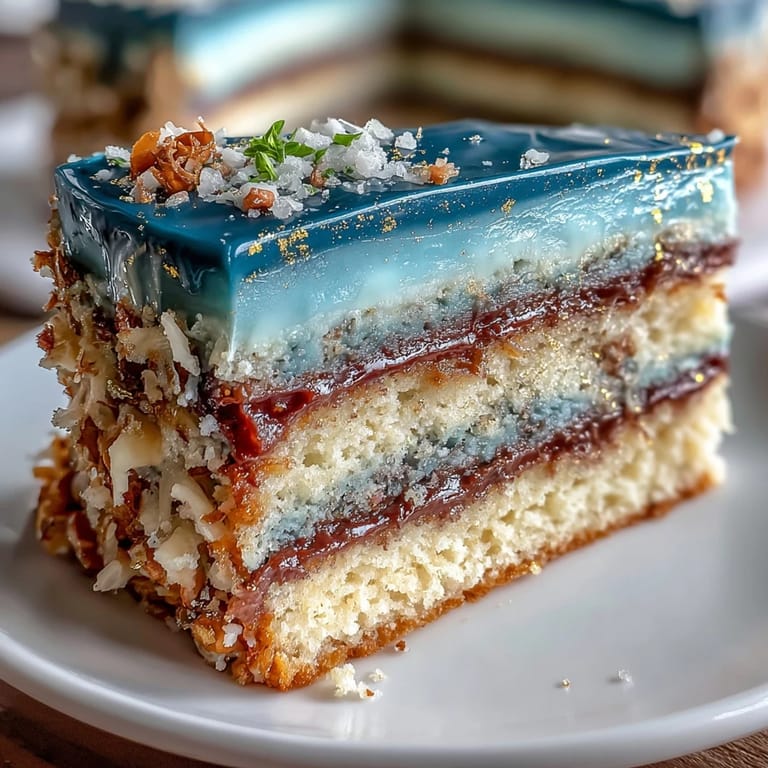
 Celebration cakes always carry a little magic. With blue ombre and golden sparkle, this one feels every bit as triumphant as the milestone it marks.
Recipe FAQs
- → How do I achieve the ombre effect?
Divide batter into bowls and use varying shades of blue gel coloring for a smooth gradient across layers.
- → Can I use a different buttercream flavor?
Vanilla buttercream complements the blue shades, but chocolate or cream cheese can be substituted for a unique twist.
- → What is the purpose of the crumb coat?
A crumb coat ensures a smooth finish by trapping crumbs before the final buttercream layer is applied.
- → How do I apply edible gold decoration?
Use edible gold leaf or gold dust, gently brushing onto the cake surface for brilliant accents before chilling.
- → Is the cake suitable for vegetarians?
Yes, the cake is prepared with vegetarian ingredients—no meat or gelatin is used in the base or decoration.
- → Can I make this cake ahead of time?
Yes, bake and assemble the cake up to a day in advance and chill it until ready to display and serve.